Framist's Little House

◇ 自顶而下 - 面向未来 ◇

0%

软件与系统安全 作业 - AFL 模糊测试实验

软件与系统安全 - AFL 模糊测试实验

对 Coreutils 软件集合使用 AFL 进行模糊测试,撰写测试报告

在报告中详述:

(1)自己的整个实验过程(附必要截图)。

(2)第“三、1(2)”步骤的两种输入种子构造方法,对于 fuzzing 结果的影响(是否有影响?如果有,对最终获得的路径数量、路径数增长的速度等方面的具体影响)。

(3)第“三、1”基于编译插桩的 fuzzing 与第“三、2”的基于 Qemu 动态插桩的 fuzzing,从基本原理和实验效果两方面的差异。

[TOC]

一、实验环境

1
2
3
4
5
6
OS: Ubuntu 20.04 focal
Kernel: x86_64 Linux 5.4.0-110-generic
Shell: zsh 5.8
CPU: Intel Core i5-9300H @ 8x 4.1GHz [67.0°C]
GPU: NVIDIA GeForce GTX 1050
RAM: 5155MiB / 15789MiB

二、实验准备

下载并安装 AFL

下载地址:https://github.com/google/AFL
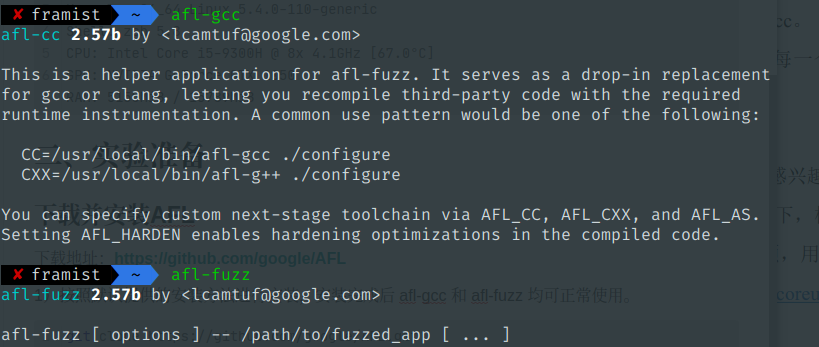
1)按照默认提供的安装方法进行安装,安装完成后 afl-gccafl-fuzz 均可正常使用。

1
2
3
4
git clone https://github.com/google/AFL.git 
cd AFL
make # 编译 AFL
sudo make install # 在系统中安装 AFL

验证 afl-gccafl-fuzz 均可正常使用:

Image

2)进入 qemu_mode 目录,使用 build_qemu_support.sh 脚本构建 FL-Qemu。

(可能需安装 libtool, libtool-bin 等依赖)。如 AFL-Qemu 安装存在问题,可预先安装 qemu

1
2
3
sudo apt-get install libini-config-dev libtool-bin automake bison libglib2.0-dev qemu -y 
cd qemu_mode
./build_qemu_support.sh # 注意需要Python2 环境
1
2
3
4
5
6
7
8
9
10
11
12
13
14
15
16
17
18
19
20
21
22
23
24
25
26
/home/hxn/桌面/AFL_studio/AFL/qemu_mode/qemu-2.10.0/linux-user/syscall.c:261:16: error: static declaration of ‘gettid’ follows non-static declaration
261 | _syscall0(int, gettid)
| ^~~~~~
/home/hxn/桌面/AFL_studio/AFL/qemu_mode/qemu-2.10.0/linux-user/syscall.c:191:13: note: in definition of macro ‘_syscall0’
191 | static type name (void) \
| ^~~~
In file included from /usr/include/unistd.h:1170,
from /home/hxn/桌面/AFL_studio/AFL/qemu_mode/qemu-2.10.0/include/qemu/osdep.h:75,
from /home/hxn/桌面/AFL_studio/AFL/qemu_mode/qemu-2.10.0/linux-user/syscall.c:20:
/usr/include/x86_64-linux-gnu/bits/unistd_ext.h:34:16: note: previous declaration of ‘gettid’ was here
34 | extern __pid_t gettid (void) __THROW;
| ^~~~~~
/home/hxn/桌面/AFL_studio/AFL/qemu_mode/qemu-2.10.0/linux-user/ioctls.h:173:9: error: ‘SIOCGSTAMP’ undeclared here (not in a function); did you mean ‘SIOCSRARP’?
173 | IOCTL(SIOCGSTAMP, IOC_R, MK_PTR(MK_STRUCT(STRUCT_timeval)))
| ^~~~~~~~~~
/home/hxn/桌面/AFL_studio/AFL/qemu_mode/qemu-2.10.0/linux-user/syscall.c:5597:23: note: in definition of macro ‘IOCTL’
5597 | { TARGET_ ## cmd, cmd, #cmd, access, 0, { __VA_ARGS__ } },
| ^~~
/home/hxn/桌面/AFL_studio/AFL/qemu_mode/qemu-2.10.0/linux-user/ioctls.h:174:9: error: ‘SIOCGSTAMPNS’ undeclared here (not in a function); did you mean ‘SIOCGSTAMP_OLD’?
174 | IOCTL(SIOCGSTAMPNS, IOC_R, MK_PTR(MK_STRUCT(STRUCT_timespec)))
| ^~~~~~~~~~~~
/home/hxn/桌面/AFL_studio/AFL/qemu_mode/qemu-2.10.0/linux-user/syscall.c:5597:23: note: in definition of macro ‘IOCTL’
5597 | { TARGET_ ## cmd, cmd, #cmd, access, 0, { __VA_ARGS__ } },
| ^~~
make[1]: *** [/home/hxn/桌面/AFL_studio/AFL/qemu_mode/qemu-2.10.0/rules.mak:66:linux-user/syscall.o] 错误 1
make: *** [Makefile:326:subdir-x86_64-linux-user] 错误 2

参考这个 issue:https://github.com/google/AFL/issues/41

使用这个项目代替:https://github.com/blurbdust/AFL(或者使用 google 更新的 patch 更好)

1
get clone https://github.com/blurbdust/AFL.git

之后按照上面的步骤进行安装。

出现这个就说明安装成功了:

1
2
3
4
5
6
7
[+] Build process successful!
[*] Copying binary...
-rwxrwxr-x 1 hxn hxn 16787120 5月 24 00:09 ../afl-qemu-trace
[+] Successfully created '../afl-qemu-trace'.
[*] Testing the build...
[+] Instrumentation tests passed.
[+] All set, you can now use the -Q mode in afl-fuzz!

下载目标程序集(coreutils-9.1.tar.gz)

下载地址:https://ftp.gnu.org/gnu/coreutils/

1
2
wget https://ftp.gnu.org/gnu/coreutils/coreutils-9.1.tar.gz
tar -zxvf coreutils-9.1.tar.gz

三、实验步骤

1. 基于编译器的目标程序插桩

(1)使用 afl-gcc,生成 coreutils 的每个二进制程序,具体步骤为:

a)查看 coreutils 的 configure 选项,指定 cc=afl-gcc

1
./configure CC=afl-gcc

这一步一般用来生成 Makefile,为下一步的编译做准备,你可以通过在 configure 后加上参数来对安装进行控制,比如代码:./configure --prefix=/usr上面的意思是将该软件安装在 /usr 下面,执行文件就会安装在 /usr/bin.同时一些软件的配置文件你可以通过指定 –sys-config= 参数进行设定。有一些软件还可以加上 –with、–enable、–without、–disable 等等参数对编译加以控制,你可以通过允许 ./configure –help 察看详细的说明帮助

b)生成 coreutils 二进制程序集。make 出来的每一个插桩后二进制均在 coreutils-9.1/src 目录下。

1
make

(2)为 coreutils 的特定程序确定输入种子

coreutils 包含很多二进制程序,自己从中选择 3 个感兴趣的程序进行 fuzzing。

构造输入种子列表,存放于 coreutils-9.1/src/input 目录下,构造方法可以选择:

a)学习 coreutils 文档中这 3 个程序的命令行选项,用这些命令行选项构建
(文档见 https://www.gnu.org/software/coreutils/manual/coreutils.html)。

b)直接用随机构造的任意字符串作为输入种子。

1
2
3
mkdir input
mkdir output
cp ../../AFL/dictionaries/* ./input # 将字典拷贝到input目录下

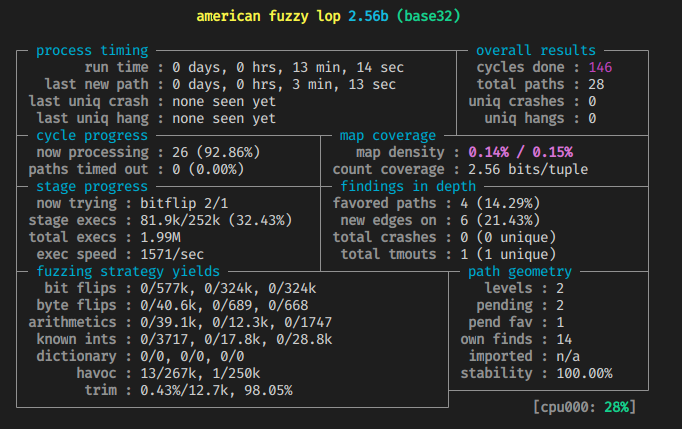
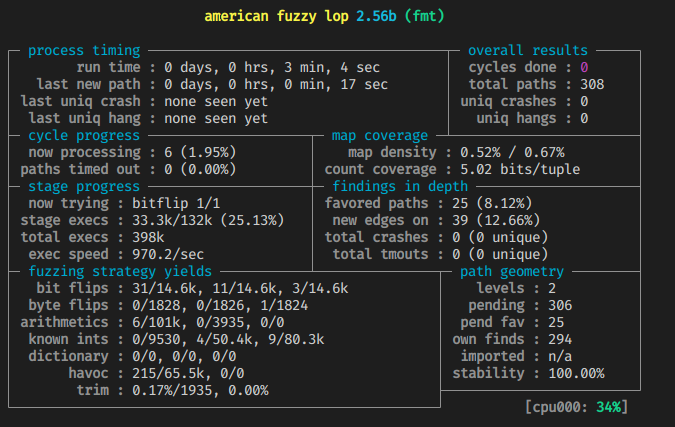
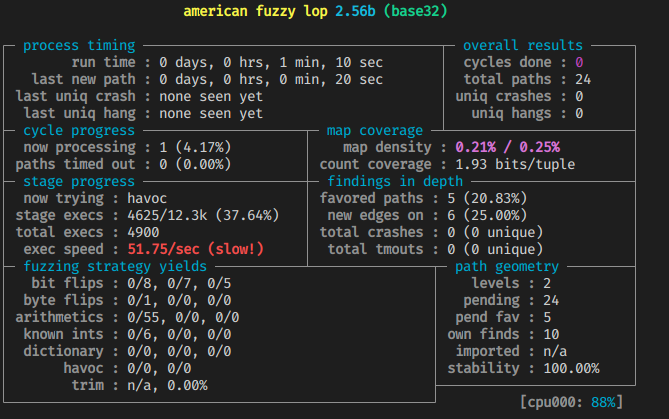
(3)在 coreutils-9.1/src 目录下,使用 afl-fuzz -i input -o output ./[程序名] @@进行 fuzzing,一段时间后终止 fuzzing 并在 coreutils-9.1/src/output 目录下查看测试结果。

出现的问题大都可以按提示进行修复

1
2
3
4
5
6
7
8
9
[-] Hmm, your system is configured to send core dump notifications to an
external utility. This will cause issues: there will be an extended delay
between stumbling upon a crash and having this information relayed to the
fuzzer via the standard waitpid() API.

To avoid having crashes misinterpreted as timeouts, please log in as root
and temporarily modify /proc/sys/kernel/core_pattern, like so:

echo core >/proc/sys/kernel/core_pattern

解决方法:

1
2
su
echo core >/proc/sys/kernel/core_pattern

出现问题:

1
2
3
4
5
6
7
8
9
10
11
Whoops, your system uses on-demand CPU frequency scaling, adjusted
between 781 and 4003 MHz. Unfortunately, the scaling algorithm in the
kernel is imperfect and can miss the short-lived processes spawned by
afl-fuzz. To keep things moving, run these commands as root:

cd /sys/devices/system/cpu
echo performance | tee cpu*/cpufreq/scaling_governor

You can later go back to the original state by replacing 'performance' with
'ondemand'. If you don't want to change the settings, set AFL_SKIP_CPUFREQ
to make afl-fuzz skip this check - but expect some performance drop.

解决方法:

1
2
3
su
cd /sys/devices/system/cpu
echo performance | tee cpu*/cpufreq/scaling_governor

出现问题:

1
2
3
[-]  SYSTEM ERROR : Unable to create './output/queue/id:000000,orig:gif.dict'
Stop location : link_or_copy(), afl-fuzz.c:2959
OS message : Invalid argument

推测是文件系统的问题,目前运行在 NTFS 中,复制整个工程到 Linux 系统盘上试试。
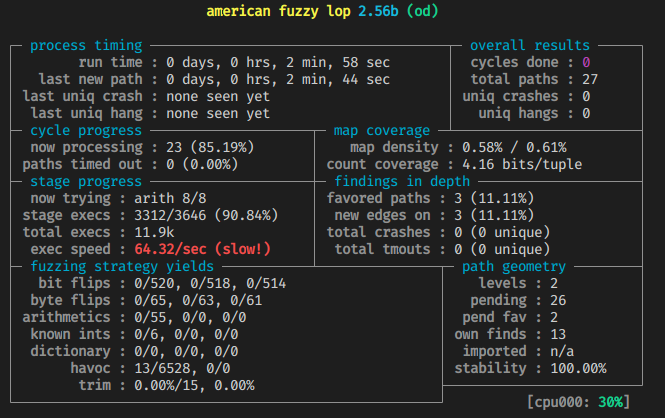
1
afl-fuzz -i input -o output ./od -x @@

Image

Image

Image

https://www.cnblogs.com/unr4v31/p/15237728.html

什么时候可以停止 fuzzer?其中一个指标可以参考cycles done 的数字颜色,依次会出现洋葱红色,黄色,蓝色,绿色,变成绿色时就很难产生新的 crash 文件了。

2. 基于 AFL-Qemu 的目标程序动态插桩

(1)重新生成 coreutils 的每个二进制程序(不使用 afl-gcc,而是用默认 gcc 进行 configure/make)。

1
2
./configure
make

(2)使用 afl-fuzz 的 -Q 选项,对你的 3 个 coreutils 程序进行 fuzzing。构造输入种子的方法同上。
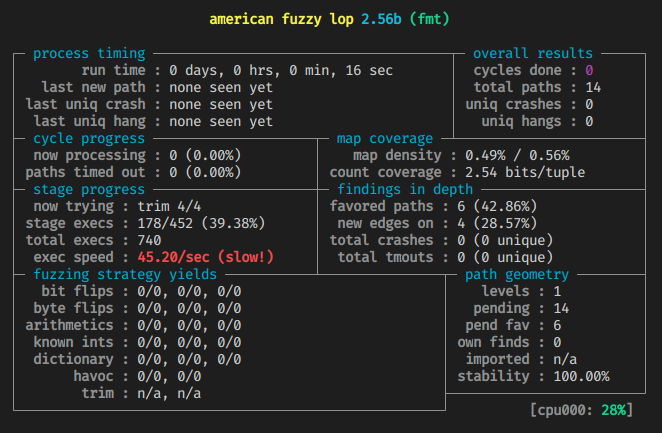
1
afl-fuzz -Q  -i input -o output od -x @@

可以看出相比直接插装要慢好多

Image

Image

Image

四、问题思考

第“三、1(2)”步骤的两种输入种子构造方法,对于 fuzzing 结果的影响(是否有影响?如果有,对最终获得的路径数量、路径数增长的速度等方面的具体影响)。

有影响:因为 AFL 可以通过启发式算法自动确定输入,但是如果直接用随机构造,最开始只能适应一般情况,而对特定程序的针对性不强。根据程序的输入构建一个高质量的语料库,能更好指导变异生成的随机输入,能发现更多路径数量,路径增长速度更快,就能获得更快的 Fuzzing 速度。

第“三、1”基于编译插桩的 fuzzing 与第“三、2”的基于 Qemu 动态插桩的 fuzzing,从基本原理和实验效果两方面的差异。

基本原理: 插桩分为动态插桩和静态插桩。基于编译插桩的 fuzzing 就是静态插桩,静态插桩发生在编译之前,PREPROCESS 这个阶段;基于 Qemu 插桩的 fuzzing 是动态插桩,在程序运行的时候发生,也就是每个 INPUTEVAL 阶段。因此,静态插桩相较于动态插桩有更优的开销,而动态插桩则更加容易对 DLL 进行插桩。除了基于源码的插桩,还有基于二进制文件的插桩,即未知源码的插桩技术。常见的动态插桩工具有 DynInst、Dynamo、RIOPIN、Valgrind、QEMU 等。

实验效果: 基于编译插桩的 fuzzing 的速度要远高于基于 Qemu 动态插桩的 fuzzing。但是基于 Qemu 动态插 桩的 fuzzing 不需要获取程序的源码,可执行文件就可以。

参考资料

https://zhuanlan.zhihu.com/p/128972800

https://www.jianshu.com/p/c70afbbf5172

https://blog.csdn.net/youkawa/article/details/45696317